We recommend that you use the Microsoft Outlook application for Android devices, however if you wish to use the native or other Android app to access your hosted exchange mailbox please follow the instructions below:
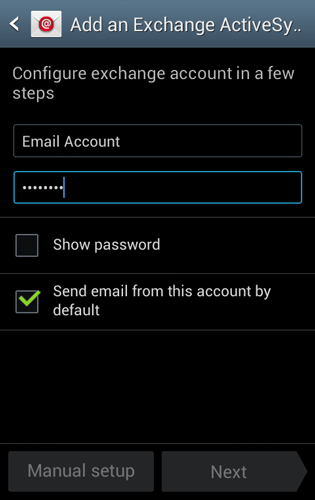
1) From your Android home screen access your phone settings and then Accounts. Then select Add Exchange ActiveSync account. Enter your Email address and Password. Check Send email from this account by default (available only if you have already added another email account) to set this as the default email account and then touch Next
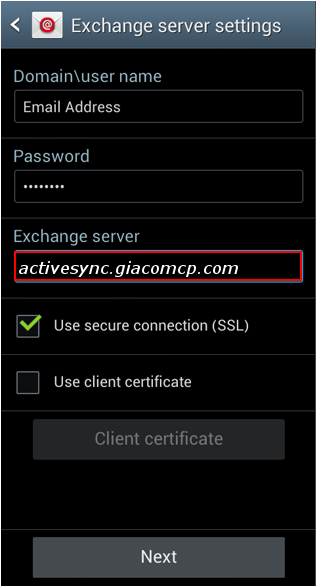
2) Your device will attempt to automatically find the additional details needed to set up your account. If it cannot automatically find the additional details needed, you will see the message Setup could not finish. Touch Edit details or configure manually to enter the additional information manually:
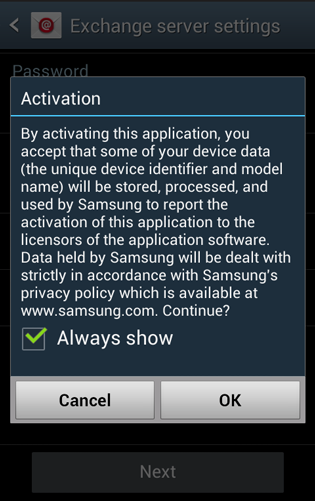
3) Review the Activation screen. Uncheck the Always show option if you do not want to see this message again when setting up an ActiveSync account, and touch OK
4) The phone will then check the Exchange Server settings and display the Remote Security Administration message: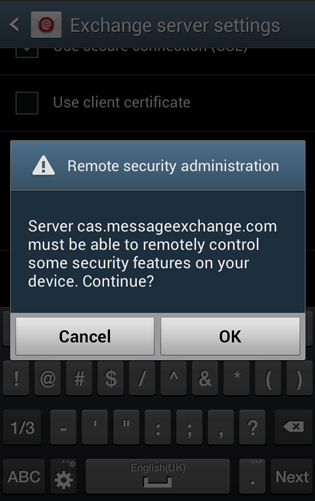
Touch OK
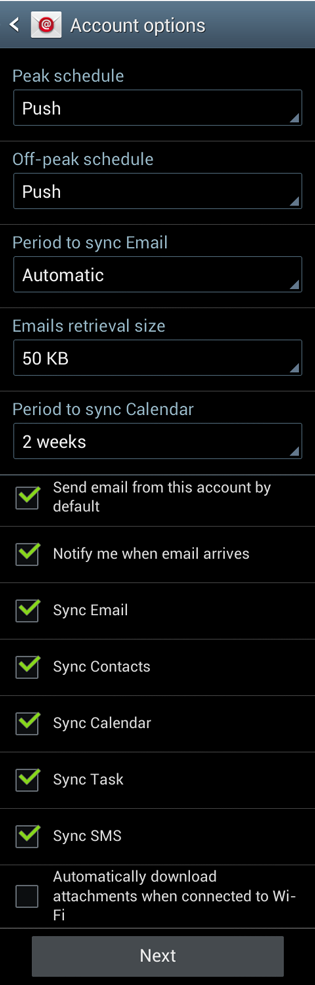
5) The Account options screen allows you to select the following ActiveSync options:
PLEASE NOTE: Options may vary depending on the type of account you are viewing.
- Peak schedule: Choose how often your device should connect to the Exchange server to get email during peak business hours. Choose Push to have email delivered to your device as soon as it arrives on the server
- Off-peak schedule: Choose how often your device should connect to the Exchange server to get email during off-peak business hours. Choose Push to have email delivered to your device as soon as it arrives on the server
- Period to sync email: Choose the time period your device should keep in sync
- Emails retrieval size: Set an email size limit. Your device will download only the headers for emails that exceed this limit. When you open the message, you will be able to download the entire message
- Period to sync Calendar: Choose the time period your device should keep in sync
- Send email from this account by default: Mark this option to send all new email messages from this account by default
- Notify me when email arrives: Mark this option to have your device notify you when you have new email messages
- Sync email: Mark this option to synchronize your email to your device
- Sync Contacts: Mark this option to synchronize your contacts to your device
- Sync Calendar: Mark this option to synchronize your calendar to your device
- Sync task: Mark this option to synchronize your tasks to your device
- Automatically download attachments when connected to Wi-Fi: Mark this option to set your device to automatically download email attachments when you are connected to a Wi-Fi® access point
When you are happy with the settings, scroll to the bottom and touch Next
6) Enter a name for the account. This will help you easily identify this account if you add other email accounts to your device. Then touch Done.
